
Recipe 17 : How to Make Silicone Prosthetics - Part 1
- Koji Ohmura
- Jan 13
- 5 min read
Updated: Mar 13
This is the most advanced material, silicone! Yes, silicone prosthetics are trending, but they are pricey. Let's make sure that you are on the right path and do not waste expensive materials. I will show you the "flat mold" technique in this article.

When I was in FX shops such as W.M. Creations and ADI, I was mostly dealing with foam latex prosthetics. I sometimes used silicone for CSI dummy bodies. Yes, many FX shops tend to have separate departments: lifecasting, mold making, sculpting, fabricating, animatronics, painting, and "on set" makeup artist. In this recipe, I will explain from the beginning to the finished product. (The application is in another article.) It might be a long one, but sit back and please enjoy!
1.Tracing Session
Materials you need...
Model (In the video, I used a facecast mold since the model was absent.)
Plastic Wrap
Tape
Sharpie
Scissors
Material links are here.
Lesson Video
Plastic Wrap Tracing
Since I am making a flat mold for this session, I will not need too many details. So, I use a tracing technique instead of face casting. This is much cheaper and faster than using face casting. A lot of wig makers use this idea.

I used a facecast mold since the model was absent. First, you will cut a large enough piece of plastic wrap to cover the entire face.
Then, place it on the model's face. Do not cover it tightly. She can't breathe!
Open the holes for her nose.
I use Scotch Tape to create a 3-D shape all over the plastic wrap. You might need to tape multiple layers to get a fitted shape.

Tape it from all angles.
Marking
I use a Sharpie pen to draw outlines of the prosthetics I like to make. For this one, I am making 8 pieces: a unicorn horn, 2 forehead pieces, 2 eyebrow covers, 2 cheeks, and a neck.

Creating the outlines of prosthetics. I also draw directions of textures and facial details (eyes, ears, nose, etc.).

Directions of textures. Remove the tracing sheet from the model and trim it along the outlines. Please make sure to write down numbers so you will not forget where the pieces go.

It is a great idea to have a design to double-check the positions.
2.Sculpting Session
Materials you need...
White Project Board
Pencil
Tracing Plastic Sheet from above
NSP Chavant Clay Medium Brown
Oven
Sculpting Tools


Material links are here.
Transfer Outlines
Now, you have tracing sheets from the last session. Place them on a white project board. Make sure the board is coated well and smooth.

Transferring the outlines. Use a pencil to transfer the outline to the board. Keep some space in between each piece.
The neck piece is placed upside down to save some space. I added some small pieces in between the main pieces. I can use them as blenders if needed.

Forehead piece
Sculpting - Blocking
You can skip this process, but it will help you speed things up. NSP Chavant Clay will soften when it is warm, so I cut it into small blocks and put them in an oven. Lay a piece of aluminum foil on the rack so melted clay does not fall on a heating element. Then, set the oven to 150 degrees Fahrenheit. Wait for 10-15 minutes.

150 degrees Fahrenheit will make NSP clay easier to handle. Once the clay gets soft, take a small amount of clay. Smudge it onto the board. Keep in mind that the clay layer stays inside of the outlines.

Keep the clay within the outlines. Then, use a kidney metal sculpting tool. This will give the clay layer even thickness. I like the kidney tool with teeth on it. It makes the process faster than the one without teeth.

Kidney tool gets rid of bumpiness. The next step is a big rake tool. This rake tool also has teeth on it. Keep doing the same process until it gets even thickness.

Big Rake Tool Once more, another rake tool. This one has less sharp teeth. Same thing as above. Make the clay an even thickness and less bumpy. Also, you can focus on making the edge tapered.

Less sharp teeth The last one is Drywall Sanding Paper. Continue the same process and make the clay smoother. 99% Alcohol will help the clay melt a bit and fill the gap on the edge. Then, wipe the melted clay with a paper towel. Close your eyes and feel the clay with your fingers. If you notice the edge of the clay, it means that the edge is not blended well. "Don't Look! Feeeel! (like Bruce Lee said, "Don't Think! Feeeel!"

3M Drywall Sanding Paper You might think this process is unnecessary; however, without having a smooth base, the prosthetic will not blend well on human skin. Always remember that prosthetic makeup needs to be blended well and look natural.

"Don't Look, Feeeeel!" with Bruce Lee accent.
Texturing
When you make a silicone flat mold, you need to think about the thickness. Especially when you want to cut costs, this is important. If it is a thick sculpture, you will need a lot of silicone for a negative mold. If you want a thick sculpture, you should use a traditional 2-part mold (stone or resin) instead of a 1-part flat mold. For this makeup, I picked a 2-part mold for a horn sculpture. I will explain this in the different recipes.

2-part mold for a horn prosthetic. I used a small rake tool for fish scale textures. I did not want to make this makeup too hairy since it is a female makeup. So I imagined this makeup as a hybrid like Mystique.

V textures for this makeup. First, I briefly made V/U shapes everywhere. Then, I used a torch and heated them up. The hard shape of the Vs will melt with heat. Do not make it burnt or bubbly.

Heat will soften the oil clay.. Then, use a desk duster. Position it upside down and spray on the sculpture. It will create frozen air and the sculpture will harden.
After it gets hard and organic enough, I use a cat brush to create a human texture. When you use a cat brush, make sure to go with a crisscross motion. Also, check the model's skin texture for the depth. The most important area is near the edges. It needs to blend with the model's.

Using a metal wire cat brush. The last step is baby powder. Trim a chip brush at an angle and brush the powder on. It will soften the cat brush texture and get rid of extra clay. If you are satisfied with the look, continue to mold making.

Baby powder and a chip brush. 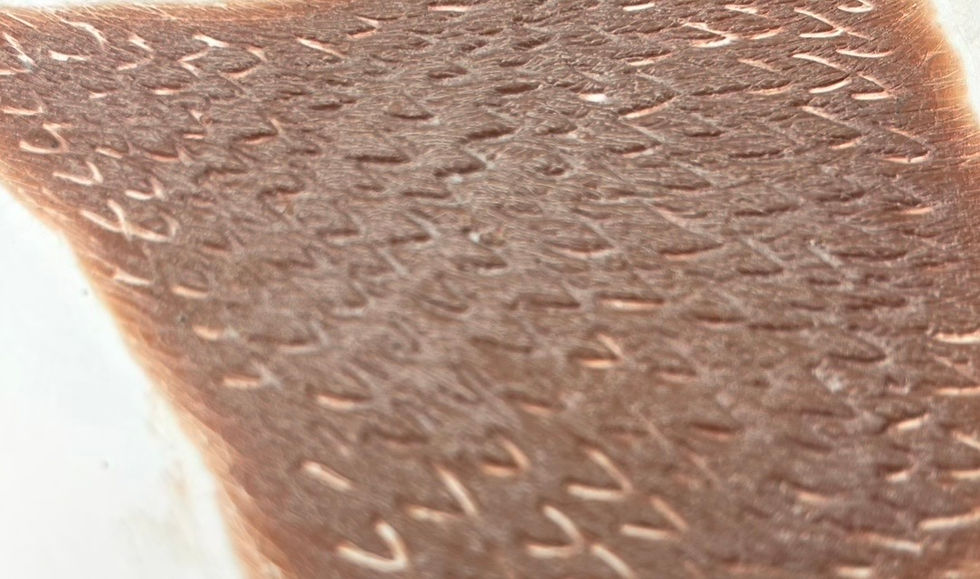
Finished look Although I did a fish scale shape for this sculpture, you can try age makeup, scars, creatures, androids, etc., with this technique. You can try your preferred look. The video below is "How to Sculpt Old Age Makeup."
Next, the step is mold making. Please click the button below for the next page.
Featured Items


DISCLAIMER: Links included on this page might be affiliate links. If you purchase a product with the links that I provide, I may receive a small commission. There is no additional charge to you! Thank you for supporting me so I can continue to provide you with FREE content each week!


Comments